Last weekend, we finally decided it was time to get a Roomba robotic vacuum. This decision was made easier by the relatively good price and availability of the iRoomba 585 at Sam’s Club. While this isn’t a product review, I’ll take a moment to say that so far the results are excellent.
Included with the unit was one “virtual wall“, a little black box that shoots out an infrared beam, creating an invisible line you don’t want the robot to cross. This allows you to keep it from going somewhere you don’t want it to go without physically placing some obstruction in its path. The virtual wall works great, but one just isn’t enough in our case. Luckily, it took just a bit of Googling before I was ready to build my own.
Circuit
It turns out that the virtual wall isn’t too complex. Basically, it sends out a repeating pattern of ON/OFF infrared signals, each one a millisecond long. These signals ride on a 38kHz carrier frequency, just like most infrared remote controls, meaning that an ON signal is actually being pulsed ON/OFF about 38,000 times per second. I won’t go into more detail here, especially because it’s beyond the scope of my expertise, but please see the references for more information on carrier frequencies.
Only a few parts were required to start building my own virtual wall, all of which I was lucky enough to have on-hand. Here I’ll put out my standard disclaimer that my electronics knowledge is pretty limited, and anything that I cobble together runs mostly on dreams and good intentions. I did my best to throw some math into this circuit, but I’m always open to helpful hints as to how to improve things.
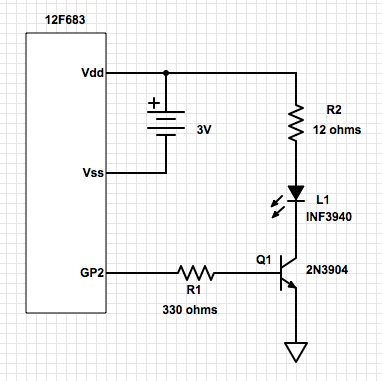
I used a PIC12F683 microcontroller because I have a bunch of them. They’re inexpensive and pretty robust, so I bought a pack of ten a while back on eBay. In this simple circuit, I use the PIC’s pulse-width modulation (PWM) capabilities to generate the 38kHz carrier frequency. The PWM pulses are output through the GP2 pin, which turns on the transistor, letting current flow through the infrared LED, thus generating the required signals.
Components
- PIC12F683 Microcontroller
- R1 – 330 ohm 1/4-watt
- R2 – 12 ohm, 1/4-watt
- Q1 – 2N3904 (Datasheet)
- L1 – Infrared LED (Datasheet)
Source Code
The source code is written for the HI-TECH C compiler, which is included in the older version of the MPLAB IDE I’m still using. I first tested sending a steady stream ON/OFF pulses, which had the desired effect of making the robot stop and turn. In an attempt to extend battery life, however, I’ve settled on sending out a blast of pulses, then putting the microcontroller to sleep for a couple hundred milliseconds. My assumption is that the robot won’t travel too far in that time. So far, the results look positive.
#include <htc.h>

__CONFIG(FOSC_INTOSCIO & WDTE_OFF & PWRTE_OFF & MCLRE_OFF & CP_OFF &
	CPD_OFF & BOREN_OFF & IESO_OFF & FCMEN_OFF);

#ifndef _XTAL_FREQ
 #define _XTAL_FREQ 2000000
#endif

#define PWM_OFF CCP1CON = 0x10
#define PWM_ON CCP1CON = 0x1c

#define BURST_COUNT	10					// How many IR bursts to send

// GP2 - PWM output
void main() {

	int i;

	OSCCON = 0x51;                      // Internal 2MHz osc.

	ADCON0 = 0;                         // all pins digital
	ANSEL = 0;                          // all pins digital
	CMCON0 = 7;                         // Comparators off.
	TRISIO = 0;                         // all output
	GPIO = 0;                           // all pins low

	PR2 = 0b00001100 ;					// Set up PWM for roughly 38kHz
	T2CON = 0b00000100 ;
	CCPR1L = 0b00000110 ;
	PWM_OFF;

	PSA = 0;							// Don't use Timer0 prescalar
	WDTCON = 0b00010000;				// Prescalar = 1000 = 8192 = 272ms

    while (1){

		// Send a few IR bursts
		i = BURST_COUNT;
		while( i-- )
		{
			// Virtual wall is 1ms on, and 1ms off
			PWM_ON;
			__delay_us(1000);
			PWM_OFF;
			__delay_us(1000);
		}

		// Then sleep for a moment
		SWDTEN = 1;		// Enable watch dog timer
		asm("sleep");
		SWDTEN = 0;  	// Disable watch dog timer
    }
}
Next Step
I’ve got the microcontroller programmed and the components permanently soldered onto a perma-proto board. I’ve tested it using a CR2032 coin cell battery as the 3-volt source, and positioning it just right in a doorway with a small piece of a drinking straw over the infrared LED to make it more directional. The next step, and the one most likely to confound me, will be finding a suitable enclosure, especially one pretty enough to be left out in the open and not look like I made it.
References
http://www.enide.net/webcms/index.php?page=virtual-wall-for-roomba
https://sites.google.com/site/irobotcreate2/createanirbeacon
http://www.micro-examples.com/public/microex-navig/doc/097-pwm-calculator.html
http://led.linear1.org/1led.wiz
Update 8/9/2014: I posted a second part to this article here that includes the final product.
Nice project! Have any finished pictures? I’m lacking enough walls as well and will try this soon hopefully!
Thank you. I bought a case to put it in, but I’m still working on getting it finalized. I’ll update the article with pictures once I get it done.
I finally finished the final project and posted the details here:
http://misc.ws/2014/08/09/diy-virtual-wall-for-roomba-part-two/
Thanks for the interesting post.
I’m planning to do something similar, but I’m going to use an Atmega8L.
What range do you get with this setup?
What about battery lifetime?
I put a little more work into this a few weeks ago, but I still haven’t gotten it into a case or done much testing. My goal is to run it on a more common, smaller battery type, such as AAA. In my updated version, I added a button and a status LED. When I push the button, it stays on for another hour, up to 10. Since I have to start the Roomba manually, I don’t mind hitting a button on the virtual wall right beforehand to get the most out of the batteries. I blink the status LED every five seconds just to know that it’s on.
I’ll see if I can get better answers to your questions soon.
I finally finished the final project and posted the details here:
http://misc.ws/2014/08/09/diy-virtual-wall-for-roomba-part-two/
Pingback: DIY Virtual Wall for Roomba – Part Two | misc.ws
Pingback: Roomba Virtual Wall – Projects
Having several roomba virtual walls (2 older version and 2 newer version) I am think of using them as beacons or walls for other homebrew robots. Anyone done that?