My goal for this project was two-fold. First, I wanted to create an in-car media player capable of storing enough videos and music to keep things interesting for my kids on long trips. Although my car came equipped with a DVD player, storing discs in the car and constantly swapping them in and out, not to mention having to wrestle with those diabolical DVD menus, is not a direction I wanted to go. Second, I really wanted to put my Raspberry Pi to good use after having it lie around for several months while I worked on other things. Luckily, I succeeded on both fronts.
Components
When I decided to build an in-car media computer, I got to work collecting all of the necessary components. This was one of those times when I didn’t really have anything I needed on-hand, except for a handful of USB and audio cables, so I have the misfortune of knowing with a pretty high degree of precision how much it cost me to put this together.

RASPBERRY PI MODEL B 756-8308 Raspberry Pi B – $43.50
8GB SD Card – $10
Externally powered USB hub (eBay) – $4.90
500GB External Hard Drive – $50
Raspberry Pi Case (eBay) $9.50
Bussmann (BP/HHH-RP) ATM Mini Circuit Converter– 2 x $6.99
Molex 3-Circuit Connectors – $5.00
Raspberry Pi Car Power Supply Ignition Switch – $25.00
Rii Mini Wireless Keyboard with Mouse Touchpad– $17
18 Gauge Primary Wire – $10
Software – OpenElec – Free
Audio and USB Cables – On-hand
LCD Screen – Vehicle Built-in
Total Cost – $188.88
Software
The software part of building a media player with the Raspberry Pi is incredibly simple, to the point that I won’t spend a lot of time talking about it. There is essentially one full-blown software media player for the Raspberry Pi that I’m aware of, and that is XBMC, which plays a multitude of both audio and video formats. Two operating system images are available for download here that provide a complete XBMC-based media center distribution, OpenElec and Raspbmc. I gave both a try and ultimately found OpenElec to be more responsive on the Pi, so that’s what I’ve stuck with.
Most configuration in both distributions is done through the menus and is very easy to accomplish. Setting up an IR remote and adding a script to monitor my power supply required that I set up SSH to log in remotely, but neither of those tasks proved to be difficult or time-consuming. Selecting an interface theme that works well on a low-resolution screen is probably the most challenging issue I’ve faced from a software configuration standpoint, and I’m really not sure I’ll ever solve that one.
Power Supply
Providing power to the Raspberry Pi and its components proved to be my biggest hurdle in this project. Although it’s easy to draw power from an accessory socket while the car is running, there are a few things that need to be taken into consideration:
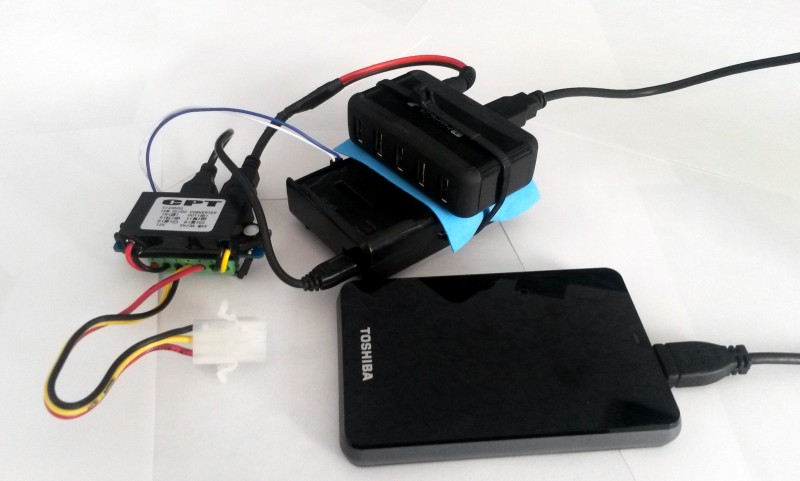
- The Raspberry Pi requires a 5v power supply that can provide somewhere around 1A of power. If you add USB accessories, the power requirement obviously increases. If you attach a device with a higher current draw, such as a USB-powered hard drive, you need to go through an externally powered USB hub. Therefore, a relatively hefty power supply might be needed, depending on the components you’re working with.
- The Raspberry Pi is a computer, and, as such, should really be started up and shut down properly to avoid corrupting the SD card or any externally attached drives. Simply plugging the Pi into an accessory socket that loses power abruptly when the car is turned off is just asking for trouble.
- Powering directly from the battery will either lead to inconvenience in the form of manually turning the Pi on and off, or to eventually draining the car’s battery completely.
With these factors in mind, the ideal in-car power supply should be:
- Able to provide sufficient current for the Raspberry Pi and any external devices.
- Directly powered from the battery to avoid abrupt power loss.
- Aware of the accessory or ignition status so it can turn off the Pi at the appropriate times.
- Able to communicate with the Pi, letting it know when to initiate a clean shutdown.
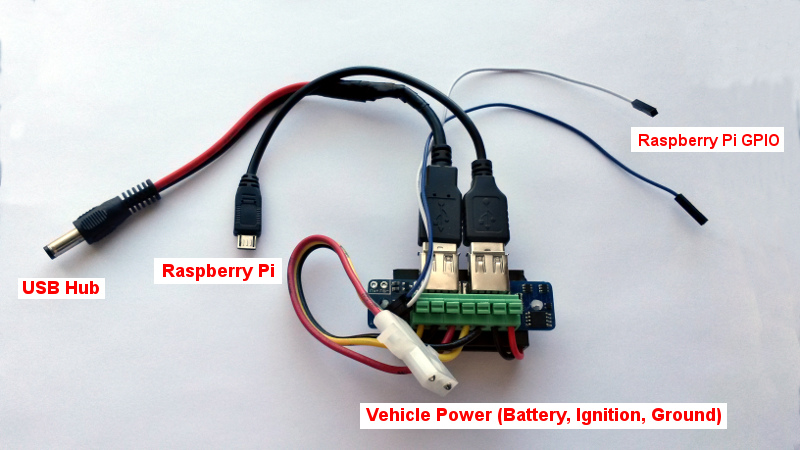
Fortunately, such a power supply exists, and it can be found here at mausberrycircuits.com. They currently offer two car supply/switches, one that provides 2A and another that provides 3A. These power supplies connect to a vehicle’s ground, battery and accessory lines as well as to two of the the Raspberry PI’s GPIO pins (one in, one out), allowing for two-way communication.
When the vehicle’s ignition is turned on (or the key is put in the accessory position), these smart little switches turn on, powering up the Pi and any external devices. When the ignition is turned off, the Pi continues to receive power from the battery, but it will also be made aware of the power loss through a signal sent to a GPIO pin. A script running on the Pi can then decide what it wants to do. It can initiate a clean shut down immediately, or perhaps it can wait a few minutes to see if the power comes back on before going through the trouble. When the Pi does shut down, a signal back to the power supply tells it to remove power completely, thus fully powering down the Pi and any other components.
Mausberry.com provides scripts for several Raspberry Pi distributions. I took the script provided for OpenElec and modified it in a couple of ways. First, I have a waiting period from the time I turn off the ignition to when it actually initiates a system shutdown. This means that a quick stop for whatever reason won’t result in waiting around for the Pi to boot up when we get going again. Second, I send a command to XBMC when the power is removed that causes it to stop whatever media is currently being played. Doing this seems to help XBMC remember where it was when you go back to resume playing the same file. It also means that media doesn’t continue to play during the waiting period before shutdown, when the car and display are off.
Scripts for other distributions as well as installation instructions are provided at mausberry.com. Below is the version I’ve modified for use with OpenElec.
#!/bin/bash
# Name: power_switch.sh
# Description: OpenElec power monitor script for use with mausberry.com car power switch
#
# Installation:
# 	Copy this script to /storage/.config/power_switch.sh
#	Add line "/storarge/.config/power_switch.sh &" to /storage/.config/autostart.sh
#
# delay = number of seconds to wait before shutting down
delay=180
i=0

#this is the GPIO pin connected to the lead on switch labeled OUT
GPIOpin1=23
#this is the GPIO pin connected to the lead on switch labeled IN
GPIOpin2=24

echo "$GPIOpin1" > /sys/class/gpio/export
echo "in" > /sys/class/gpio/gpio$GPIOpin1/direction
echo "$GPIOpin2" > /sys/class/gpio/export
echo "out" > /sys/class/gpio/gpio$GPIOpin2/direction
echo "1" > /sys/class/gpio/gpio$GPIOpin2/value

# Loop indefinitely
while [ 1 = 1 ]; do
	power=$(cat /sys/class/gpio/gpio$GPIOpin1/value)
	if [ $power = 0 ]
	then
		# Accessory power is ON
		echo "Accessory power is on"
		i=0
	elif [ $power = 1 ] && [ "$i" == "$delay" ]
	then
		# Accessory is OFF and delay seconds reached
		echo "Shutting down"
		xbmc-send --action="PlayerControl(Stop)"
		xbmc-send --action="Powerdown"
		# In case the above fails to power down, do it through OS
		sleep 30
		poweroff
	else
		# Accessory power is OFF
		echo "Accessory power has gone off"
		let i=$i+1
		if [ "$i" == "1" ]
		then
			# Stop video when accessory power first goes off.
			echo "Telling XBMC to stop player"
			xbmc-send --action="PlayerControl(Stop)"
		fi
	fi

        # Sleep one second before checking power again
        sleep 1
done
Getting it Wired
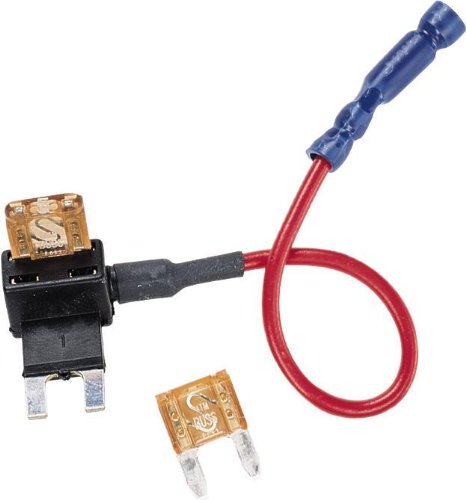
As I mentioned, the power supply requires three wires: battery positive, ignition (accessory), and ground. I’m not very daring when it comes to messing with my car’s wiring, so it took some thought to figure out how to get this thing working. One of those thoughts was having someone with more know-how do it for me, but that costs money. After wandering around my local AutoZone for a little while, I discovered these little devices that allow you to add a fused circuit to an existing line through the fuse box.
Fortunately, there is a very accessible fuse box on the inside of my car. Using a voltmeter, I was able to locate two empty slots, one connected directly to the battery and one connected to the ignition line. I used a 5A fuse from the battery and a 2.5A fuse to the ignition connector, then ran those two wires, along with a ground wire, under the dash and middle console to their final location under the passenger seat where my Raspberry Pi lives now. I terminated those wires with a Molex 3-connector male plug, and attached a matching female plug to my Raspberry Pi power supply so I’d have the option to remove or replace it later with ease. In the end, it’s convenient, safely fused, and, most importantly, out of sight.
Audio / Video
My vehicle has a built-in LCD screen along with auxiliary audio and video inputs, which made adding the media player a breeze. While the picture quality isn’t the greatest, especially through the Raspberry Pi’s composite video output, it’s more than adequate for watching a DVD-quality movie. Navigating the XBMC menus is a little challenging, as the text becomes difficult to read on the low-resolution screen, but there are some XBMC themes that make it more bearable than others.
Audio comes from the Raspberry Pi’s built-in 3.5mm jack and also plugs into the auxiliary ports via a 3.5mm to stereo RCA jack cable. The sound probably isn’t fantastic to someone who notices that kind of thing, but it’s been more than adequate for the intended audience and caliber of media we’ve pushed through it.

User Input
My original plan was to use a IR sensor and remote control to operate the media computer. I first experimented with a bare IR receiver and followed this guide with great success. For the final product, I purchased this IR Receiver from monoprice.com, which looks clean and works great. I got everything working with an old, bulky Sony remote control but planned to get something more like this one from adafruit.com.
However, with my spare time was running short and a road trip only a few days off, I ended up buying a miniature wireless keyboard from Amazon.com. This turned out to be a great solution and one I intend to stick with. It’s easy to use, even for kids, and provides a lot more flexibility than an IR remote control. It even has a built-in touchpad mouse, so it’s a complete solution if you need it for some other purpose. A built-in laser pointer might also be useful to some. In my case, I covered it with electrical tape before putting it in my kids’ hands, and, thankfully, no one has taken the time to discover what’s under it.

Final Thoughts
Shortly after getting the media player all put together, we took a fairly lengthy road trip. To my surprise, the kids did a great job of entertaining themselves the old fashioned way, gazing out the window and asking repeatedly if we were there yet. The media player was put to great use though, and there was never so much as a hiccup.
Given the choice, I’d certainly opt for a really nice built-in media system in my vehicle, rather than cobbling something homemade together, as I’ve done here. But I’m very satisfied with the way it turned out. The installation is clean, with the Raspberry Pi and all but the audio/video cables neatly tucked out of the way, and I’ve got plenty of disk space for storing videos. Adding new media is as simple as bringing the USB drive in the house, plugging it into my computer, and loading it up. Also, all of the parts can easily be re-purposed should I choose.
Additional Photos
This picture shows the fuse box with the two wires that go to the power supply. I had to do some minor surgery on one of them to get it to fit because they are directional, and there was no room for the wire attached. So, I cut it open, repositioned the wire, then melted it back together a bit. It’s not pretty, but it gets the job done.

I ran the wires from the fuse box under the steering column, down the center console, and under the front passenger seat, attaching them with a cable tie to another set of wires where they don’t interfere with the seat’s movement. The Raspberry Pi power supply connects here and lives under the seat.

Can you provide more pics from the fuse box? I’m a little confused by your description about the fuses: “I used a 5A fuse from the battery and a 2.5A fuse to the ignition connector, then ran those two wires, along with a ground wire…” Did you tap into two separate fuse sockets with one circuit converter in each slot?
Thanks!
Hi,
Great article, I am wanting to do the same for my own vehicle but have one question. Does the mausberry PSU power the raspberry pi back on automatically when you turn the ignition back on after a shutdown?
Thanks
Thank you, Dan. Yes, the PSU comes back on automatically when the accessory line is powered.
Bussmann/Eaton offers free samples of their new class J fuse block to ensure their clients of its power distribution capability.
HI Justin,
Can you us prode more pictures from the fuse box? That part is confusing me.
how you run wire ?
where you place your R Pi
Thanks
I added a couple of photos. Hopefully it illustrates it a little better.
Hi Justin,
Thanks for additional pictures. It’s much clearer how you connect wires in fuse box.
However, one more request due to my ill knowledge.
Three wire come out of “3A Car supply Switch” (Red / Yellow /Black),
What I understand Red =Battery (5A fuse), Yellow=Ignition (2.5A fuse) and Ground=Black
Questions:
1- Fuse box in picture is interior Fuse Box on driver side?
2- In your fuse box picture, two pink wires, one is RED (Fuse#35). Is second one is YELLOW (Fuse#6)?
3- Where BLACK one will be connected / or where should I connect?
Thanks
Sunny
Have you thought about running an automated script when connected to your home WiFi that updates the media in your car? Just have it look at the specific folder at a predetermined each day or week or whenever and add in the new files. You could use FFmpeg to auto convert the files as well so they are optimized for the car.